1. 文本 Text
1.1 定义
Text定义
const Text(
    //要显示的文字内容
    this.data,
   {
    //key类似于id
    Key key,
    //文字显示样式和属性
    this.style,
    this.strutStyle,
    //文字对齐方式
    this.textAlign,
    //文字显示方向
    this.textDirection,
    //设置语言环境
    this.locale,
    //是否自动换行
    this.softWrap,
    //文字溢出后处理方式
    this.overflow,
    //字体缩放
    this.textScaleFactor,
    //最大显示行数
    this.maxLines,
    //图像的语义描述,用于向Andoid上的TalkBack和iOS上的VoiceOver提供图像描述
    this.semanticsLabel,
  })
TextStyle定义
const TextStyle({
    //是否继承父类组件属性
    this.inherit = true,
    //字体颜色
    this.color,
    //文字大小,默认14px
    this.fontSize,
    //字体粗细
    this.fontWeight,
    //字体样式,normal或italic
    this.fontStyle,
    //字母间距,默认为0,负数间距缩小,正数间距增大
    this.letterSpacing,
    //单词间距,默认为0,负数间距缩小,正数间距增大
    this.wordSpacing,
    //字体基线
    this.textBaseline,
    //行高
    this.height,
    //设置区域
    this.locale,
    //前景色
    this.foreground,
    //背景色
    this.background,
    //阴影
    this.shadows,
    //文字划线,下换线等等装饰
    this.decoration,
    //划线颜色
    this.decorationColor,
    //划线样式,虚线、实线等样式
    this.decorationStyle,
    //描述信息
    this.debugLabel,
    //字体
    String fontFamily,
    List<String> fontFamilyFallback,
    String package,
  })
1.2 Demo
1.2.1 基本使用
class Textdemo extends StatelessWidget {
  const Textdemo({super.key});

  @override
  Widget build(BuildContext context) {
    return const Center(
      child: Text(
        "Sakura",
        style: TextStyle(
          // 文字大小
          fontSize: 20,
          // 文字颜色
          color: Colors.blue,
          // 下划线
          decoration: TextDecoration.none,
          // 文字粗细
          fontWeight: FontWeight.normal,
        ),
      ),
    );
  }
}

1.2.2 文字溢出
class Textdemo extends StatelessWidget {
  const Textdemo({super.key});

  @override
  Widget build(BuildContext context) {
    return const Center(
      child: Text(
        "SakuraSakuraSakuraSakuraSakuraSakuraSakuraSakuraSakuraSakuraSakuraSakuraSakuraSakuraSakuraSakuraSakuraSakuraSakuraSakuraSakuraSakuraSakuraSakur"
            "aSakuraSakuraSakuraSakuraSakuraSakuraSakuraSakuraSakuraSakuraSakuraSakuraSakuraSakuraSakuraSakuraSakuraSakuraSakuraSakuraSakuraSakuraSakuraSakuraSakuraSakuraSakuraSakuraSakuraSakuraSakuraSakuraSakuraSakura",
        textAlign: TextAlign.center,
        softWrap: true, // 换行(默认就有)
        maxLines: 2, // 最多显示 2 行
        overflow: TextOverflow.ellipsis, // 溢出文字行为: 加省略号
        style: TextStyle(
          // 文字大小
          fontSize: 20,
          // 文字颜色
          color: Colors.blue,
          // 下划线
          decoration: TextDecoration.none,
          // 文字粗细
          fontWeight: FontWeight.normal,
        ),
      ),
    );
  }
}
1.2.3 富文本 RichText 和 Text.rich
Text.rich和RichText定义
💡 源码注释:
*See [RichText] which provides a lower-level way to draw text.请参阅 [RichText],它提供了一种较低级别的文本绘制方式。*
const Text.rich(
    // 样式片段标签TextSpan
    this.textSpan,
  {
    Key key,
    this.style,
    this.strutStyle,
    this.textAlign,
    this.textDirection,
    this.locale,
    this.softWrap,
    this.overflow,
    this.textScaleFactor,
    this.maxLines,
    this.semanticsLabel,
  })

const RichText({
    Key key,
    // 样式片段标签TextSpan
    @required this.text,
    this.textAlign = TextAlign.start,
    this.textDirection,
    this.softWrap = true,
    this.overflow = TextOverflow.clip,
    this.textScaleFactor = 1.0,
    this.maxLines,
    this.locale,
    this.strutStyle,
  })
TextSpan定义
const TextSpan({
    //样式片段
    this.style,
    //要显示的文字
    this.text,
    //样式片段TextSpan数组,可以包含多个TextSpan
    this.children,
    //用于手势进行识别处理,如点击跳转
    this.recognizer,
  })
class Textdemo extends StatelessWidget {
const Textdemo({super.key});
@override
Widget build(BuildContext context) {
return Center(
child: Text.rich(TextSpan(
text: "Hello",
style: const TextStyle(
color: Colors.red,
fontSize: 30,
decoration: TextDecoration.none,
),
// 为文字添加交互
recognizer: TapGestureRecognizer()
..onTap = () {
print("点击了");
},
// TextSpan 中嵌套 TextSpan
children: const [
TextSpan(
text: "The Weight of the World",
style: TextStyle(
color: Colors.blue,
fontSize: 20,
),
),
TextSpan(
text: " Hello",
style: TextStyle(
color: Colors.yellow,
fontSize: 20,
),
),
TextSpan(
text: "World",
style: TextStyle(
color: Colors.blue,
fontSize: 40,
),
)
])));
}
}
2. 图片 Image
2.1 定义
Image 定义,可以接受所有类型实现了 ImageProvider 的类型,NetWorkImage AssetImage FileImage
💡 如果这些无法满足需求,可以通过自定义
ImageProvider设计图片来源
//通过ImageProvider来加载图片
const Image({
    Key key,
    // ImageProvider,图像显示源
    @required this.image,
    this.semanticLabel,
    this.excludeFromSemantics = false,
    //显示宽度
    this.width,
    //显示高度
    this.height,
    //图片的混合色值
    this.color,
    //混合模式
    this.colorBlendMode,
    //缩放显示模式
    this.fit,
    //对齐方式
    this.alignment = Alignment.center,
    //重复方式
    this.repeat = ImageRepeat.noRepeat,
    //当图片需要被拉伸显示的时候,centerSlice定义的矩形区域会被拉伸,类似.9图片
    this.centerSlice,
    //类似于文字的显示方向
    this.matchTextDirection = false,
    //图片发生变化后,加载过程中原图片保留还是留白
    this.gaplessPlayback = false,
    //图片显示质量
    this.filterQuality = FilterQuality.low,
  })
Image.network 定义
// 加载网络图片,封装类:NetworkImage
Image.network(
    //路径
    String src,
   {
    Key key,
    //缩放
    double scale = 1.0,
    this.semanticLabel,
    this.excludeFromSemantics = false,
    this.width,
    this.height,
    this.color,
    this.colorBlendMode,
    this.fit,
    this.alignment = Alignment.center,
    this.repeat = ImageRepeat.noRepeat,
    this.centerSlice,
    this.matchTextDirection = false,
    this.gaplessPlayback = false,
    this.filterQuality = FilterQuality.low,
    Map<String, String> headers,
  })
Image.file 定义,
// 加载本地File文件图片,封装类:FileImage
Image.file(
    //File对象
    File file,
  {
    Key key,
    double scale = 1.0,
    this.semanticLabel,
    this.excludeFromSemantics = false,
    this.width,
    this.height,
    this.color,
    this.colorBlendMode,
    this.fit,
    this.alignment = Alignment.center,
    this.repeat = ImageRepeat.noRepeat,
    this.centerSlice,
    this.matchTextDirection = false,
    this.gaplessPlayback = false,
    this.filterQuality = FilterQuality.low,
  })
Image.asset 定义
// 加载本地资源图片,例如项目内资源图片
// 需要把图片路径在pubspec.yaml文件中声明一下,如:
// assets:
//      - packages/fancy_backgrounds/backgrounds/background1.png
// 封装类有:AssetImage、ExactAssetImage
Image.asset(
    //文件名称,包含路径
    String name,
  {
    Key key,
    // 用于访问资源对象
    AssetBundle bundle,
    this.semanticLabel,
    this.excludeFromSemantics = false,
    double scale,
    this.width,
    this.height,
    this.color,
    this.colorBlendMode,
    this.fit,
    this.alignment = Alignment.center,
    this.repeat = ImageRepeat.noRepeat,
    this.centerSlice,
    this.matchTextDirection = false,
    this.gaplessPlayback = false,
    String package,
    this.filterQuality = FilterQuality.low,
  })
// 加载Uint8List资源图片/从内存中获取图片显示
// 封装类:MemoryImage
Image.memory(
    // Uint8List资源图片
    Uint8List bytes,
  {
    Key key,
    double scale = 1.0,
    this.semanticLabel,
    this.excludeFromSemantics = false,
    this.width,
    this.height,
    this.color,
    this.colorBlendMode,
    this.fit,
    this.alignment = Alignment.center,
    this.repeat = ImageRepeat.noRepeat,
    this.centerSlice,
    this.matchTextDirection = false,
    this.gaplessPlayback = false,
    this.filterQuality = FilterQuality.low,
  })
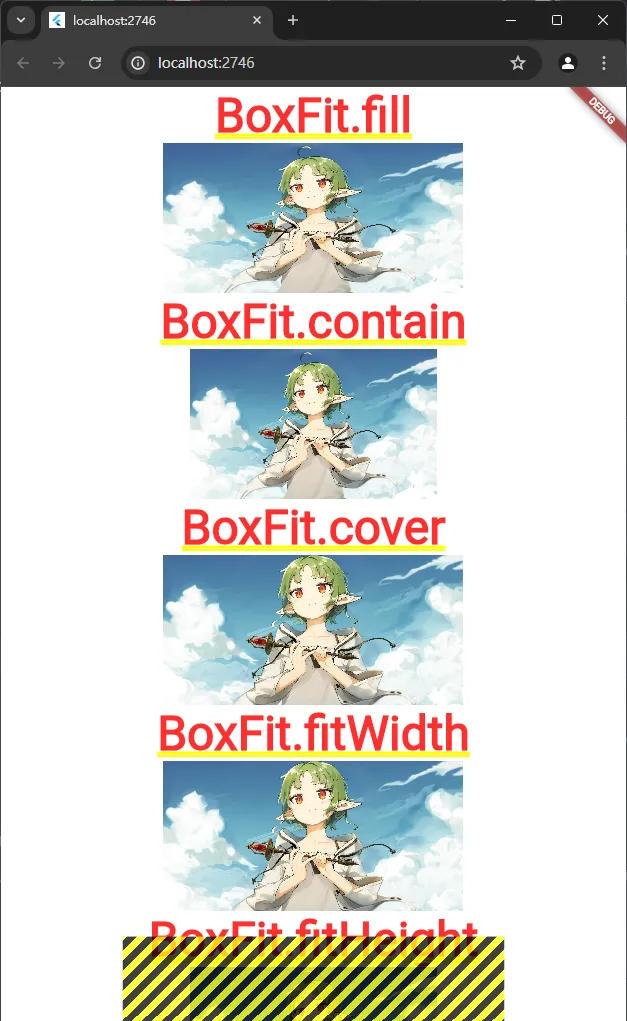
2.2 fit 图片大小适配
class Imagedemo extends StatelessWidget {
  const Imagedemo({super.key});

  Widget ShowImage(BoxFit fit) {
    return  Column(
      children: [
        Text("$fit"),
        SizedBox(
          width: 300,
          height: 150,
          child: Image(
            image: const AssetImage(TestImage.testPng2),
            fit: fit,
          ),
        ),
      ],
    );
  }

  @override
  Widget build(BuildContext context) {
    return Center(
      child: Column(
        children: [
	        // 重点
          for (var item in BoxFit.values) ShowImage(item),
        ],
      ),
    );
  }
}
2.3 图片 colorBlendMode 混合模式
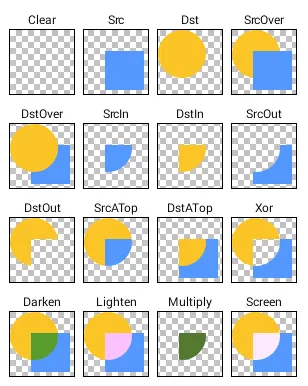
// 枚举定义
enum BlendMode {
  clear,src,dst,srcOver,dstOver,srcIn,dstIn,srcOut,dstOut,srcATop,dstATop,xor,plus,modulate,screen,overlay,darken,lighten,colorDodge,colorBurn,hardLight,softLight,difference,exclusion,multiply,hue,saturation,color,luminosity,
}
import 'package:flutter/material.dart';

class ImagesPage extends StatelessWidget {
  const ImagesPage({Key? key}) : super(key: key);

  // BlendMode
  Widget _buildBlendMode() {
    return Image.asset(
      'assets/images/welcome.png',
      color: Colors.blue,
      colorBlendMode: BlendMode.dstOver,
    );
  }

  @override
  Widget build(BuildContext context) {
    return Scaffold(
      body: Center(
        child: _buildBlendMode(),
      ),
    );
  }
}
2.4 图片占位符
网络图片由于有加载延迟,通常会先显示占位符,等网络图片下载完成后再展示图片内容。可以使用 Flutter 自带的 Fadelnlmagewidget 来实现这个功能。
FadeInImage(
	placeholder: AssetImage(""),  // 占位的图片
	image: NetworkImage("Sakura"),// 要显示的图片
);
2.5 缓存图片
当我们的App有大量网络图片,而且其中有很多可能是重复的图片时,使用图片缓存就可以很好的提升用户体验,引入 cached network image 这个 package 来实现这项功能。
3. 图标 Icon
3.1 定义
icon 定义
 const Icon(

    // IconData 图标数据
    this.icon, {
    Key? key,

    // 尺寸
    this.size,

    // 颜色
    this.color,

    // 方向
    this.textDirection,

    this.semanticLabel,
  }) : super(key: key);
在 pubspec.yaml 中开启
# The following section is specific to Flutter packages.
flutter:

  # The following line ensures that the Material Icons font is
  # included with your application, so that you can use the icons in
  # the material Icons class.
  uses-material-design: true
Material Icons 预览
3.2 Demo
class Icondemo extends StatelessWidget {
  const Icondemo({super.key});

  @override
  Widget build(BuildContext context) {
    return const Center(
      child: Column(
        children: [
          Icon(
            Icons.add_a_photo,
            size: 100,
            color: Colors.red,
            semanticLabel: "add a photo",
            textDirection: TextDirection.ltr,
          ),
          Icon(
            Icons.add,
            size: 100,
            color: Colors.blue,
            semanticLabel: "add a photo",
            textDirection: TextDirection.ltr,
          ),
          Icon(
            Icons.home,
            size: 100,
            color: Colors.black,
            semanticLabel: "add a photo",
            textDirection: TextDirection.ltr,
          )
        ],
      ),
    );
  }
}

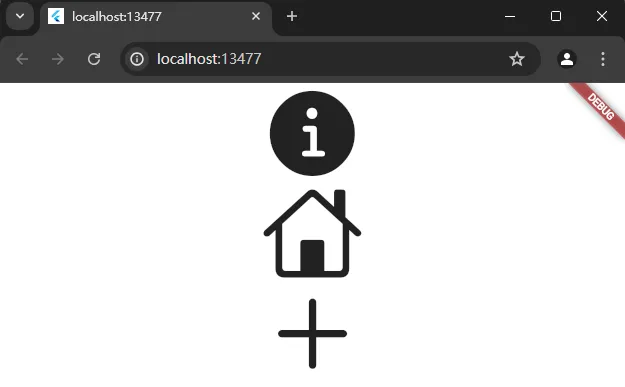
3.3 apple 风格的 icon
class Icondemo extends StatelessWidget {
  const Icondemo({super.key});

  @override
  Widget build(BuildContext context) {
    return const Center(
      child: Column(
        children: [
          Icon(
            CupertinoIcons.info_circle_fill,
            size: 100,
            // color: Colors.red,
            semanticLabel: "add a photo",
            textDirection: TextDirection.ltr,
          ),
          Icon(
            CupertinoIcons.home,
            size: 100,
            // color: Colors.blue,
            semanticLabel: "add a photo",
            textDirection: TextDirection.ltr,
          ),
          Icon(
            CupertinoIcons.add,
            size: 100,
            // color: Colors.black,
            semanticLabel: "add a photo",
            textDirection: TextDirection.ltr,
          )
        ],
      ),
    );
  }
}
4. 按钮 Button
4.1 按钮定义
Button 定义
  const ElevatedButton({
    Key? key,
    // 点击事件
    required VoidCallback? onPressed,
    // 长按
    VoidCallback? onLongPress,
    // hover
    ValueChanged<bool>? onHover,
    ValueChanged<bool>? onFocusChange,

    // 样式
    ButtonStyle? style,

    // 焦点
    FocusNode? focusNode,
    bool autofocus = false,
    Clip clipBehavior = Clip.none,

    // 按钮内容
    required Widget? child,
  })
ButtonStyle 定义
class ButtonStyle with Diagnosticable {
  /// Create a [ButtonStyle].
  const ButtonStyle({
    // 文字
    this.textStyle,
    // 背景色
    this.backgroundColor,
    // 前景色
    this.foregroundColor,
    // 鼠标滑过颜色
    this.overlayColor,
    // 阴影
    this.shadowColor,
    // 阴影高度
    this.elevation,
    // 内边距
    this.padding,
    // 最小尺寸
    this.minimumSize,
		// 固定 size
    this.fixedSize,
    // 最大最小尺寸
    this.maximumSize,
    // 边框
    this.side,
    // 形状
    this.shape,
    // 鼠标光标
    this.mouseCursor,
    // 紧凑程度
    this.visualDensity,
    // 配置可以按下按钮的区域的尺寸
    this.tapTargetSize,
    // 定义 [shape] 和 [elevation] 的动画更改的持续时间
    this.animationDuration,
    // 检测到的手势是否应该提供声音和/或触觉反馈
    this.enableFeedback,
    // 子元素对齐方式
    this.alignment,
    // 墨水效果
    this.splashFactory,
  });
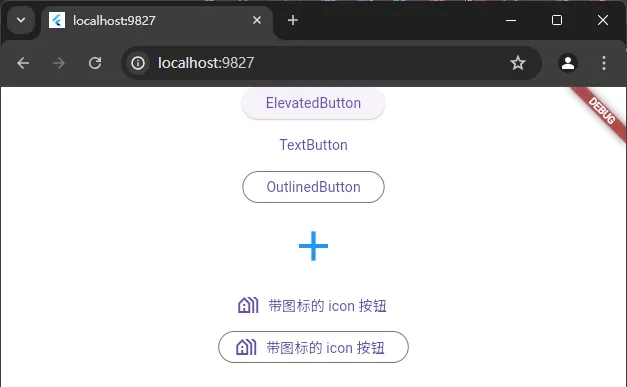
4.2 所有按钮 Demo
class Buttondemo extends StatelessWidget {
  const Buttondemo({super.key});

  @override
  Widget build(BuildContext context) {
    return Center(
      child: Column(
        children: [
          // 凸起按钮
          ElevatedButton(
            onPressed: () {},
            child: const Text("ElevatedButton"),
          ),
          const SizedBox(height: 10,),

          // 文本按钮
          TextButton(onPressed: () {}, child: const Text("TextButton")),
          const SizedBox(height: 10,),

          // 边框按钮
          OutlinedButton(
            onPressed: () {},
            child: const Text("OutlinedButton"),
          ),
          const SizedBox(height: 10,),

          // 图标按钮
          IconButton(
            onPressed: () {},
            icon: const Icon(Icons.add),
            iconSize: 50,
            color: Colors.blue,
          ),
          const SizedBox(height: 10,),

          // 带图标的icon按钮
          TextButton.icon(
              onPressed: () {},
              icon: const Icon(Icons.holiday_village_outlined),
              label: const Text("带图标的 icon 按钮")),
          const SizedBox(height: 10,),

          // 带图标的边框按钮
          OutlinedButton.icon(
              onPressed: () {},
              icon: const Icon(Icons.holiday_village_outlined),
              label: const Text("带图标的 icon 按钮"))
        ],
      ),
    );
  }
}
4.3 按钮样式 Demo
💡 关于样式修改中
WidgetStateProperty.all和WidgetStatePropertyAll的区别:源码中注释
/// If you need a const value, use [WidgetStatePropertyAll] directly.如果需要 const 值,请直接使用 [WidgetStatePropertyAll]。
class Buttondemo extends StatelessWidget {
  const Buttondemo({super.key});

  @override
  Widget build(BuildContext context) {
    return Center(
      child: Column(
        children: [
          const SizedBox(
            height: 20,
          ),
          // 凸起按钮
          ElevatedButton(
            onPressed: () {},
            style: ButtonStyle(
              // 背景色
              backgroundColor: WidgetStateProperty.all(Colors.blue),
              // 文字颜色
              foregroundColor: const WidgetStatePropertyAll(Colors.black),
              // 阴影范围
              elevation: const WidgetStatePropertyAll(20),
              // 阴影颜色
              shadowColor: const WidgetStatePropertyAll(Colors.black),
              // 现状
              shape: const WidgetStatePropertyAll(RoundedRectangleBorder(
                  borderRadius: BorderRadius.all(Radius.circular(20)))),
            ),
            child: const Text("ElevatedButton"),
          ),
        ],
      ),
    );
  }
}

5. 开关 Switch
class HomePage extends StatefulWidget {
  const HomePage({super.key});

  @override
  State<HomePage> createState() => _HomePageState();
}

class _HomePageState extends State<HomePage> {
  bool light = true;

  @override
  Widget build(BuildContext context) {
    return Switch(
      value: light, // 值
      activeColor: Colors.green, // 颜色
      onChanged: (bool value) => setState(() => light = value), // 状态改变的回调
    );
  }
}
6. 单选多选 CheckBox
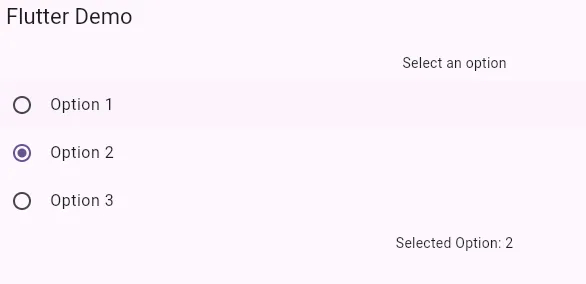
6.1 单选
class _HomePageState extends State<HomePage> {
  int voice = 50;
  int _radioValue = 1;

  @override
  Widget build(BuildContext context) {
    return Scaffold(
      appBar: AppBar(
        title: const Text("Flutter Demo"),
      ),
      body: Center(
        child: Column(
          children: [
            const Padding(
              padding: EdgeInsets.all(8.0),
              child: Text('Select an option'),
            ),
            RadioListTile<int>(
              title: Text('Option 1'),
              value: 1,
              groupValue: _radioValue,
              onChanged: (value) {
                setState(() {
                  _radioValue = value!;
                });
              },
            ),
            RadioListTile<int>(
              title: Text('Option 2'),
              value: 2,
              groupValue: _radioValue,
              onChanged: (value) {
                setState(() {
                  _radioValue = value!;
                });
              },
            ),
            RadioListTile<int>(
              title: Text('Option 3'),
              value: 3,
              groupValue: _radioValue,
              onChanged: (value) {
                setState(() {
                  _radioValue = value!;
                });
              },
            ),
            Padding(
              padding: const EdgeInsets.all(8.0),
              child: Text('Selected Option: $_radioValue'),
            ),
          ],
        )
      )
    );
  }
}
6.2 多选
class HomePage extends StatefulWidget {
  HomePage({super.key});

  @override
  State<HomePage> createState() => _HomePageState();
}

class _HomePageState extends State<HomePage> {
  bool isChecked = false;

  @override
  Widget build(BuildContext context) {
    return Scaffold(
      appBar: AppBar(
        title: const Text("Flutter Demo"),
      ),
      body: Center(
        child: Column(
          children: [
            Checkbox(value: isChecked, onChanged: (bool? value){
              setState(() {
                isChecked = value!;
              });
            })
          ],
        )
      )
    );
  }
}

7. 滑块
class _HomePageState extends State<HomePage> {
  double _sliderValue = 50.0;

  void _updateSlider(double value) {
    setState(() {
      _sliderValue = value;
    });
  }

  @override
  Widget build(BuildContext context) {
    return Scaffold(
      appBar: AppBar(
        title: const Text("Flutter Demo"),
      ),
      body: Center(
        child: Column(
          children: [
            Text('Current Value: $_sliderValue'),
            Slider(
              value: _sliderValue,
              min: 0.0,
              max: 100.0,
              divisions: 100,
              label: '$_sliderValue', // 滑动的时候显示的内容
              onChanged: _updateSlider,
            ),
            Text('Slider Value: $_sliderValue'),
          ],
        )
      )
    );
  }
}


评论区